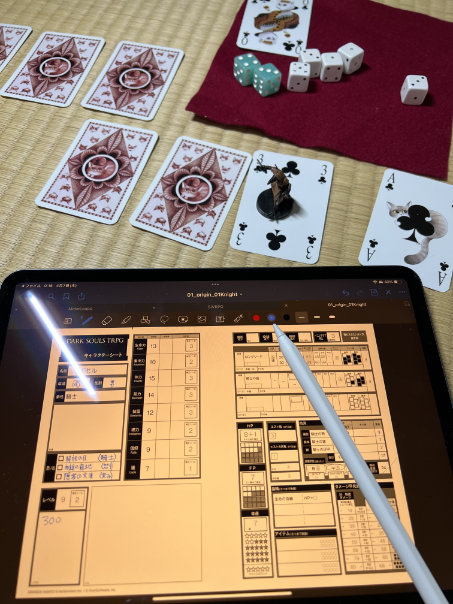
After spending so much time with the Japanese Dark Souls TRPG (part one and part two), I wanted to give its tutorial scenario a try. The following are my play through notes with my impressions at the end. I played with real playing cards and dice, but marked up a PDF version of the character sheet on my tablet. Now, it goes without saying, but this post contains spoilers for the solo Dark Souls TRPG tutorial scenario.
The scenario is intended for a single player, and I ended up playing it solo. To make it more interesting for me, I did not read the scenario beforehand. Instead, I played through while reading it for the first time, and did my best to not read ahead.
Formatting
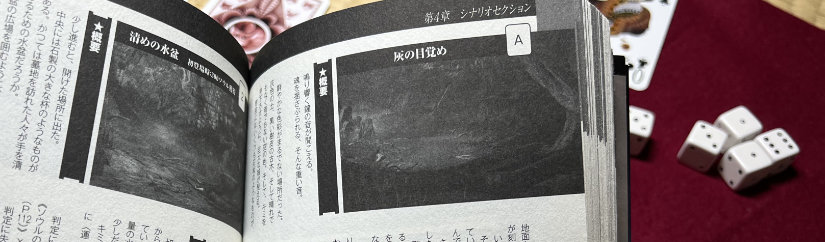
Before beginning our adventure, let’s take a look at how scenario information is presented. The beginning of the scenario gives an overview with a map at the bottom.
Each field has a section listing its corresponding card, an image of the area, and overview that is read to the players. A checkpoint is then presented with multiple options, usually with one being move to another field. Each checkpoint has a heading indicated with a star, and each section under that heading has one or more arrows to indicate continuations. With that out of the way, we begin our journey through the Cemetery of Ash.
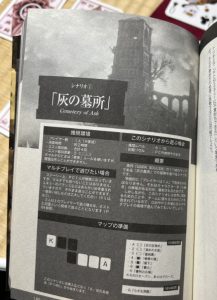
Cemetery of Ash
The Cemetery of Ash scenario is a tutorial scenario for one player that is estimated to take two hours. It’s a scenario intended for a 6-10 level PC with only the souls received during character creation. PCs have a total of four Estus flasks, each recovering three HP or FP. While intended for a single player, there are also notes for how to run multiple PCs. This scenario and map corresponds to the opening area of the Dark Souls III video game.
Setup
There are a total of seven starting fields and one interim field. Only the Ash Awakening, the first field, is open facing up. There are two sets of three fields each whose position is determined by shuffling them and then playing them face down. Being a tutorial, the map is a linear path from start to finish. This scenario does not use the Malevolence sheet.

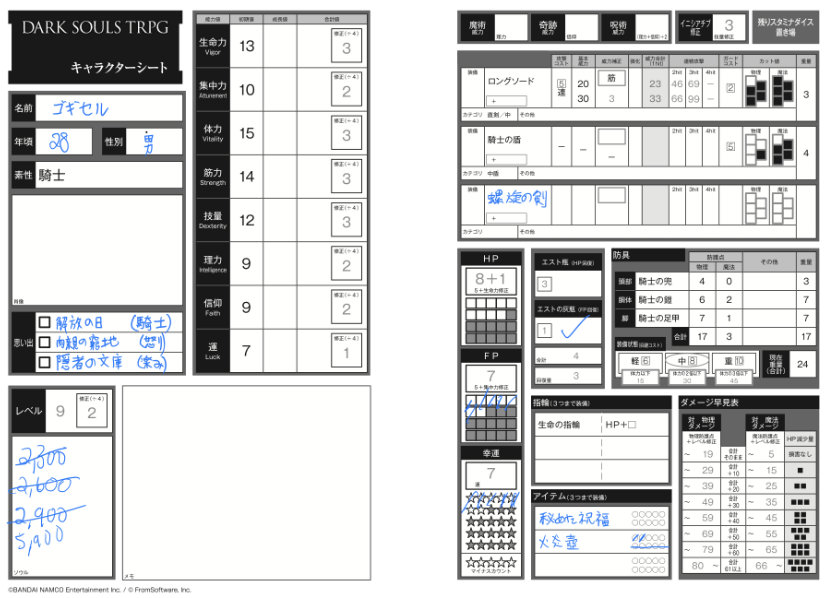
Character
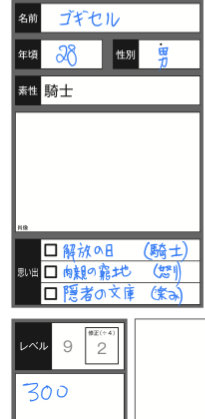
I used the pre-made Knight character, naming him Gogisel (ゴギセル), and rolled for his three memories:
- Day of Liberation from the knight’s memory table. One day, he was freed from a monastery or boarding house.
- Relative’s Predicament from the anger table. A memory of witnessing my relatives being cornered.
- Hermit’s Library from the enjoyment table. Fond memories of being engrossed in books in a dark and dusty library.
An Awakening of Ash 灰の目覚め (A)
A bell reverberates, the weight of its sound shaking your spirit. In a place devoid of vivid colors, ashen earth and an old tree with blackened bark lie under a listless sky. A massive castle overlooks you. Surrounding you are stone slabs with writing– gravestones.
The scene continues for a few more paragraphs before the first checkpoint with a single item is presented: Move to the next field. Choosing this option, I checked the section for it and continued to the next field without issue, turning over the next card to reveal the 3 of Clubs: Behind the Graveyard.
Behind the Graveyard 墓地裏 (3)
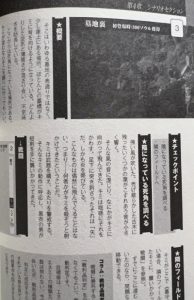
Upon entering this field, Gogisel automatically received 300 souls.
Not the main street of the so-called graveyard, but a place upon a cliff. Most grave markers have turned their backs on you. The heavy atmosphere mixed with gloom adds to the ominousness. From here there's a blind spot that you could investigate if you so desired.
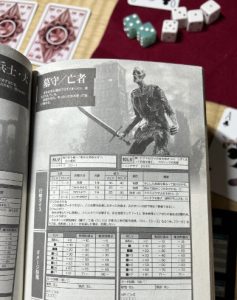
The checkpoint presented has two options: investigate the blind corner or move to the next field. Braver than me, Gogisel investigated the blind corner and was set upon by two level five Grave Wardens (墓守), one unloosing an arrow at his feet and the other advancing with a dagger.
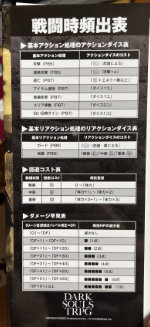
For this battle there are two safe areas. Because of the two opponents, I decided to have Gogisel fight defensively using his sword and shield. Each Grave Warden has 4HP and an initiative of 2D6-1. Enemies only roll when they first enter combat, while PCs roll each turn.
Turn 1
Rolling initiative, the Grave Wardens (A & B) ended up with a 2 and 8, respectively. Gogisel’s initiative modifier was +3 and he rolled an 11, so took the lead initiative slot with a 14.
Gogisel: With a total of five stamina dice, I decided to roll three as action dice: 5, 2, 1. Not happy with the 1, I spent 1 luck to reroll it, replacing it with a 2. Numerically not a major increase, but it did provide me the doubles needed to activate Stance by paying 2 FP. Stance deals 2-hit damage (46 points) and cannot be guarded against. I targeted the Grave Warden with the highest initiative and referenced 46 damage against the enemy’s wound chart, which translated to -4HP and a one hit kill.
Gogisel’s longsword costs 5 to attack with, so I spent the single remaining action die to attack Grave Warden A, dealing the 1-hit damage of 23 points, which translated to -2HP. The Warden used Guard to reduce that by 1, leaving it with 3HP.
Grave Warden A: Rolling a d6 on the pattern table, I rolled a 2: attack with their weapon. This did 35 points of damage, which translated to -2HP. In response, Gogisel rolled his two remaining stamina dice as reaction dice: 1, 5. The five was enough to guard with the shield and reduce the HP by 4, taking no damage.
Turn 2
Grave Warden A continues to have a 2 initiative, and I again rolled well, going first with a 15 initiative. With only one enemy left, I decided to go all out and roll all my stamina dice as action dice: 2, 3, 4, 5, 5 (yay, doubles again!). With those doubles Gogisel spent 2 FP and used Stance again to dispatch the final Warden. Victory!
After Combat
Now for the spoils. Dispatching the Wardens gave 100 souls automatically per Warden. Additionally, they may be looted by rolling a Luck check. Rather than rolling for each individual enemy, enemies are grouped by type and each group may be looted once. The target number for looting the Grave Wardens is 10, and Gogisel has a Luck modifier of +1, but he rolled a 2 and 5 for a total of 7. I spent one Luck to reroll, but rolled a 1, which cost 1 FP and still failed to find any loot.
With combat over, Gogisel proceeded to the next field checkpoint and since he had already defeated the Grave Wardens, proceeded without issue. If he had not investigated the blind corner and fought the undead, they would attack, but there’s no mention of ambush.
Purified Basin 清めの水盆 (2)
Again gained 300 souls for a total of 700. Writing this post, I realized I only recorded souls for one Warden, so should have had 800 souls.
Continuing a bit further, you come to an open area. At its center, what appears to be a large cup made of stone. Visitors to the grave yard once must have cleansed their hands in its water.
The checkpoint again had two options: search the Basin or continue to the next field. Being ever inquisitive, Gogisel searched the basin by rolling a Luck check with a target number of 8. 2d6 resulted in 3, 1, so spent 1 Luck to reroll the 1, which resulted in a 2, ultimately a failure, but with the penalty of -1 FP rolling a 1 brings. A nice touch to this section is a sidebar that summarizes how the check is made.
If Gogisel had passed the check, he would have found 500 soul fragments and 5 throwing knives hidden in the shadows of the basin. Failing, he was confident that there was nothing there and continued on to the next field.
Bonfire 篝火(6)
Gained 300 souls upon entering.
Facing the cliff is an open space. Mountainside are grave markers that remind you that this is a continuation of the graveyard. Next to a nearly extinguished bonfire sits an armor-clad man. Holding his head in his hands, he murmurs something unintelligible. As he notices you, he jumps up in surprise, exclaiming, "this mission is too much!" He then hurls himself off the cliff. As you look over the side, there is no trace of his figure in the valley below.
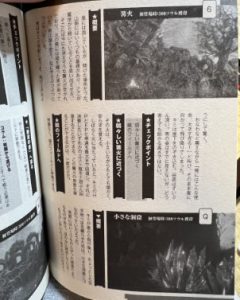
After that unsettling encounter, there are options for this checkpoint: approach the dwindling fire or continue to the next field, of which I chose the former.
Gogisel approached the fire, which can only be visited once. Resting in its warmth replenishes HP, FP, and Luck to their maximum values, but only 1 Estus flask is restored. Gogisel was down FP and Luck, but HP and Estus Flasks were already full. Nothing happened when he continued to the next field.
Beneath the Cliff 崖下 (5)
Gained 300 souls upon entering.
Looking up, you see a cliff and realize that you're at the bottom of a valley. A path leads up the cliff. The problem is there's probably someone trying to kill you lurking there.
The two options are: climb the narrow path or go to the next field. Being ever the glutton for punishment, Gogisel climbed the path. The sound of falling rocks could be heard, and a passive Luck (target 10) or Intelligence (target 12) was needed to avoid the rocks. Gogisel’s Intelligence is +2, while Luck is +1, so went with Luck, failing with double twos. He was able to dodge the smaller stones, but the large rock took Gogisel unawares. This required another passive check: Strength (target 11) or Dex (target 11). Both are +3, but went with Strength, rolling a 6 and 5 for a total of 14! At last my luck had changed and Gogisel dodged the rock, taking no damage. Had I failed, Gogisel would have lost 1 HP.
Reaching the top, a man clad in black, who had obviously thrown the rock, charged with an axe. This battle had two safe areas and one level seven Undead Soldier (large) per PC. The soldier has 5 HP, and is more resistant to physical attacks than magical.
Turn 1
The Undead Soldier rolled a 6 initiative, while Gogisel again rolled a 14, taking the lead.
Gogisel: The enemy only has 5 health, so I’m pretty sure Gogisel can take him out before he acts, but going to keep 1 Stamina for defense just in case. Rolled 4 stamina dice, which become action dice: 1, 3, 5, 5.
I thought about doing a chain of attacks, but with two doubles, I can do 2-hit damage that cannot be guarded against and still have two dice left. It felt a bit like button mashing, but I spent the 2 FP and dealt 46 damage, which decreased the Undead Soldier’s HP by 4, leaving it with one HP. In hindsight, I should have used one action die to stow the shield and use the longsword two-handed, which would have dealt 66 damage using Stance.
The remaining 1 and 3 are not enough to attack with, so I spend them to move Gogisel to a safe area.
Undead Soldier: Rolled a 3 on the pattern table bring down his axe, but my PC is already in a safe area and is not hit.
Turn 2
Gogisel lucked out and rolled a 9 initiative, again going before the Undead Soldier. With just 1 HP left, I devote all the Stamina dice to offense: 2, 4, 6, 6, 6. Triple sixes. If I had a rank in Backstab it’d be enough to trigger it, but alas Gogisel only knows Stance.
While overkill, I spend the 2 to do what I should have done last turn: stow the shield and wield the longsword two handed. Next I spend the double sixes to again use Stance, this time dealing 66 damage and handily dispatching the undead soldier, netting 100 souls.
Gogisel again tried looting with a difficulty of 11, but fails with a five. Despite this, Gogisel found a concealed blessing (秘めた祝福: spend 1 action die to restore all FP) and 5 jars of fire (火炎壺: spend 1 action die to apply 20 fire damage to one enemy in the melee area). Now to take in the amazing view from the cliffs.
Stunning Cliffs 絶景の崖 (4)
Gained 300 souls just for entering this area, which has three checkpoints:
- search the ancient tree
- look for a way down
- go to the next field
The tree is ominous, so decide to skip it and instead look for a way down. Gogisel jumped down from a ledge, attempting a Dexterity check (target number 10), rolling a 1 and 3. Wanting to avoid the spending a FP due to the 1, I use one luck to re-roll the 1, this time rolling a six for a total of exactly 10 with his +1 ability modifier. One nice thing about the descriptions of success and failure is that it describes not just the mechanical result, but what it looks like. Had he failed the check, Gogisel would have twisted his ankle and lost 1HP, but still made the jump.
Gogisel found a small cave! The Queen card is placed next to the current card. I chose to go to the next field (the small cave) and leave the ominous tree unexplored.
Small Cave 小さな洞窟(Q)
Again gained 300 souls upon entering. There are two checkpoints: deeper into the cave or go back to the the Stunning Cliffs. Despite the suspiciousness of the situation, Gogisel pressed onwards, deeper into the cave. Alas, a Ravenous Crystal Lizard attacked!
This time there is only one safe zone. The lizard is a “strong enemy” with two initiative slots and HP that scales with the number of players (5 HP per PC). There are also rules to make it deadlier when there are multiple PCs. As a player, my first instinct was to flee, but Gogisel saw the lizard as a challenge.
Turn 1
Having two initiatives ( +2 and +0 modifiers), the lizard goes on 10 and 8. Additionally, the first initiative and second initiative have different action patterns. At first I first rolled double twos for a 7 initiative, but I really wanted to go before one of the lizard’s actions, so spent two luck to re-roll and beat both initiative slots with a 14.
Gogisel: With the enemy able to take two actions, I decided to keep two stamina dice in reserve and roll three action dice: 1, 3, and 5. Spent one luck to re-roll the 1, turning the results into 3, 4, and 5. Used the 5 to Attack with the longsword for 33 physical damage, which translated to 2 HP, but the lizard’s guard reduced it by 1 for a total of 1 HP. (Lizard’s HP decreased from 5 to 4).
Spent the remaining two dice (3, 4) to chain another attack with the longsword for 66 damage that nicely translates to 6 HP before being reduced by 1 due to the guard, but the lizard still takes 5 damage, killing it. Being a “strong enemy”, I was surprised by just how quickly the beast was dispatched.
Gogisel gained 300 souls, but again failed the loot check by rolling a 1, so lost 1 FP. Being close to the end, Gogisel drank his one ashen Estus potion to restore 3 FP. His HP was still full, but Gogisel only had 2 luck left to use on re-rolls.
There is a side bar about fleeing battles. To flee one enemy, dice totally 12 would need to be spent. Also, if more than one PC, the remaining PC may become a target of all attacks. Once a PC flees, they cannot participate in the battle.
Gogisel returned to the Stunning Cliffs with just 300 souls as reward for his efforts.
Forum of Judgement 審判の広場 (K)
Gained 300 souls upon entering this field.
There is a massive stone gate. Walking upon cobblestones, you pass through its arch, finding yourself in a large circular forum. A single tree, withered and large, lords over the space, having destroyed part of the wall, its roots run deep. Further in the courtyard, opposite to where you entered, stand ornamental doors. The figure of a man kneels at the center of the yard, surprisingly still.
The two checkpoints are: approach the figure or open the doors. Intrigued by the figure, Gogisel approached it. As he drew closer, he saw a sword impaling the figure through the chest and out the back. The sword beckoned to him, and he knew he could pull it free. Gogisel gripped the sword, straining as he pulled it from the figure and a black, blood-like substance spurted forth from the wound. The figure gripped a massive axe and slowly stood.
Those who have played Dark Souls 3 know this is Judge of Ash Gundyr. Being a scenario boss battle, it’s not possible to flee. There are five safe areas and a single level 10 Gundyr (6HP, 2d6+2 and 2d6-2 initiative). Similar to the lizard, there are rules for increasing the difficulty of this boss when there are multiple players.
Turn 1
Rolling well, Gogisel’s initiative was 11, while Gundyr’s initiatives are 6 and 3. Focusing on offense by wielding the longsword two-handed had worked well, so I decided to continue that approach and not use the shield.
Gogisel: My first thought was to keep 2 dice for reactions, but decided to roll all stamina dice as action dice with the idea of moving to a safe zone after attacking. I rolled 1, 1, 2, 3, and 5, which tempted me to use luck and re-roll, but with only a little left, decided to save it for an emergency.

I used the 5 to attack, dealing 33 damage that translated to 2 HP, but Gundyr blocked all of it. Remembering the five jars of fire from earlier, I spent the 3 to throw one, dealing 20 fire damage. That translated to only 1 HP, but it turns out Gundyr has a weakness to fire, which decreased his HP by an additional 1 (6HP – 2HP = 4HP remaining). Next spent the 2 to throw another flask, again decreasing Gundyr’s HP by 2 (4HP – 2HP = 2HP remaining). With the final two dice, Gogisel moved to the safe zone.
Gundyr, action 1: Rolled a 2 on the pattern chart, causing Gundyr to thrust his axe, but Gogisel was unaffected in the safe zone.
Gundyr, action 2: rolled a 5 on the pattern chart: mow down (薙払い), which targets everyone. This thankfully missed Gogisel because he was in the safe area. whew
Turn 2
I again got an 11 initiative, while Gundyr’s remained unchanged at 6 and 3. Gogisel is automatically forced back into the fray and there are now only 4 safe zones left.
Gogisel: Decided to try the same tactic again, hoping for more dice to chain attacks with. Rolling all stamina dice as action dice, I got: 1, 3, 5, 5, 6. Much, much better! Spent the doubles to use Stance for 66 damage, which translates to 6 HP that cannot be guarded, killing Gundyr. But wait! Gundyr’s second form emerges, and the battle continues with form two re-rolling initiative.
Turn 3
Gogisel was again lucky (initiative 11) and acted before both of the new form’s initiatives (8 and 5).
Gogisel There are still four safe zones left, so he continued with the same tactic of all action: 2, 2, 2, 3, 5. Spent the double 2s and 2FP to use Form and deal 66 physical damage, just enough to translate to 5HP (6HP – 5HP = 1HP remaining). Almost dead!
Next spent the 5 to attack once for 33 damage, but the new form’s wound table is has higher thresholds, so that 33 damage now only translates to 1HP, which was guarded and reduced to 0.
My original plan was to go to the safe area, but with only 1 HP left, decided to throw a flame flask for 20 fire damage that becomes 2HP: one from the damage and one from its weakness. Gundyr is only able to guard once per turn, so was unable to guard against this damage, leading to a very dead Gundyr!
For his efforts, Gogisel automatically received the Coiled Sword (螺旋の剣) and 300 souls. Tried looting, but again failed with an 8 against a target number of 11.
With Gundyr now dispatched and his worth proven, Gogisel was able to open the doors and continue to Fire Link Shrine and access the Fire Keeper. Three thousand souls were rewarded for completing the scenario.
Impressions
This was my first solo play of a TRPG, and I enjoyed it. Running the enemies was very easy and streamlined, with little thought needed to make them work. The mechanics and balancing stamina dice was fun, and having options even for low dice gave some diversity to actions. Using the longsword two handed felt like the optimal choice for most battles, as did being aggressive and using all dice for actions. The threshold for the damage chart was often 65, so with the longsword’s 2-hit damage of 66, made it very efficient to wield two-handed. Being a tutorial, the difficulty was scaled down, but I was expecting another turn or two for each combat. Gogisel’s initiative was consistently high, so it likely would have been harder if he went after the enemies. I’d like to try another scenario at some point to see how it scales in difficulty.